One Piece vs. Sectional Push Pole – What do you have and why?

Push Pole Poll
  • 1-Piece Push Pole
  • Sectional Push Pole
0 voters

The classic tried and true 1-piece Stiffy Push Pole how does it compare to sectional push poles these days.

Back in September 2008 I did an article on MS as part of our Project NMZ Gheenoe. Below I copied the text, but sadly the images are lost. If I can find them in my archives I’ll add them.

In the article I built a TFO Mangrove Push Pole. Granted this article and the push pole I built is almost 17 years old, so I’m not sure if the pole I build back then is still available today. I’d expect not.

I’d love to hear if you are using a 1-piece or sectional. Which brand and why. Cost? Performance? Easy of purchasing? Material Technology? Warranty or Easy of repair?

BYOPP - Build your own Push Pole

BYOPP - Build your own Push Pole

The Mangrove push pole by TFO are 56" carbon fiber sections are joined with “ferrules”. The push pole that can easily be shipped right to your door. You then carefully put the pieces together using epoxy/cement and off you go!
See Pushing the NMZ Skinny! for dealer and cost options.

How to assemble your new TFO pushpole.
by Capt. Scot Graham

This is real easy, just take your time and read these instructions!

A few things you will need:

  1. A high quality epoxy, such as West Systems epoxy.
  2. Cheap paint brushes for applying epoxy.
  3. Acetone.
  4. Clean rags/ and a full roll of paper towels
  5. 40-80 grit sand paper
  6. Masking tape, or duct tape.
  7. Patience! Don’t rush it.

Always wear proper safety equipment when sanding, mixing, and handling resins.

Safety glasses, gloves, a dust mask, and adequate ventilation are necessary for assembly.

Follow the manufacturers safety instructions on the epoxy and acetone labels.

*You may notice some ferrules will fit looser than others, this is normal as the mandrels are tapered. The epoxy will fill the gaps tight.

Four easy steps.

Preparation:

As with any molded composite product, there is a release agent applied to the mold to get the product off/ out when it has cured. We need to clean the mold release residue from the pole sections, the ferrules, and the point and foot or the sections will not bond.

Step 1: Sand
Take your sand paper and scuff sand the inside of each pole section to about six inches (tape sandpaper to a wood dowel or broom stick) and the outside of each ferrule, as well as the point and foot fittings. ***You will get a better bonding bite if you sand in a circular motion around each piece as opposed to up and down the length of each piece

Step 2: Clean
With paper towels, liberally apply acetone and wipe the inside of each pole section, the outside of each ferrule, and the male sections of the point and foot (try not to get any on the visible sections of the point and foot as it may stain or deform the nylon).

Step 3: Set up to glue
If you run your hand up and down the push pole section, you will notice a “grain” to it, this is due to the orientation of the graphite tape. We want all sections to have the grain going the same direction so…

We will “match mark” each section with tape.

First, orient each section so the grain is going the same direction.

Let’s say we’re assembling a four piece pole, on one end of the first section we will leave it blank, for the point or foot (no tape). On the other end we will put a piece of tape lengthwise about an inch from the end w/ a line on it. Set section one aside.

On section two we will put a piece of tape on the corresponding end that will match up to section one w/ a line on it. On the other end of section two, we will place a piece of tape with two lines on it. Set section two aside.

On section three we will put a piece of tape w/ two lines to the end corresponding to section two, and a piece w/ three lines on the other end.

On section four put a piece of tape w/ three lines to the end corresponding to section three. Leave the other end of section four blank for the point or foot.

Now, check your work. Place all corresponding match marks together and make sure the grain all goes the same direction.

Ferrules:
Measure the halfway point on each ferrule and place tape w/ an arrow pointing to this line.

Step 4: Let’s Glue it up!
We’re going to be gluing in three steps. This is where you need to take your time and don’t rush it!
Don’t mix more epoxy than you think you will need for three joints.
For the first step we will need Pole sections one, two, and three, and three ferrules.

If you touched any part w/ your hands that will be a glued surface, you must re-clean w/ acetone before gluing. The oils in your skin will compromise the bond

1: Start with pole section one on the end that has match mark ONE.

Now put a liberal coating of epoxy on ONE half of the ferrule up to the center mark on the tape. Assemble the ferrule with a twisting motion to get full coverage. When the ferrule is into the pole section up to the centerline, clean all excess resin w/ acetone, set aside. Now repeat with pole section two and the second ferrule at match mark TWO. And then the third section at match mark THREE.

Once pieces are glued up, place two pieces of tape lengthwise from each pole section to ferrule to hold the ferrule from pushing out.

Place all glued pieces on a horizontal surface (like a table) with a light weight (such as a rag) on top of your sections, turn them each one quarter turn every two minutes to assure centering of the ferrule.

Let both sections fully set up (per epoxy instructions) before proceeding to the next step.

2: Peel off ferrule center mark tape (don’t touch your match marks, yet!)

Apply epoxy to the ferrule at match mark one of section one,

Now apply epoxy to ferrule match mark two on section two. Repeat w/ section three to four.

Glue in the point, DO NOT glue the foot, yet!

Clean off excess. Tape these joints lengthwise to help avoid slippage while curing. On a flat surface, turn entire pole one quarter turn every two minutes while epoxy sets up.

3: Now you add the foot, clean excess, tape to hold, and let cure.

It is best to let the pole cure for at least twenty four hours before applying pressure to it. If you followed the instructions your multi piece pole will be as strong as a one piece pole, if you pop a ferule out, you didn’t prep good enough. Clean, sand, and glue again.

4.8lbs
24’ Stiffy Guide. I have it because when I sold my Professional my push pole went with the skiff to the new owner. I was due to fish the Cowford Redfish Tournament in JAX just a few days after I bought the Waterman and my son drove it down from Wilmington, so I had to have a new push pole. If I had time, I would have gone with a Carbon Marine G3LR mostly because I am a friend of Joe’s and have had several of his push poles in the past. The 24’ G3LR weighs a little over 4 lbs. I think the G3LR is more comparable to the Stiffy Extreme, which I would have bought if the shop had it in stock at the time I needed one.

2 Likes

I snapped a 24’ Extreme. Worst part was it was not my boat or pole but it was me who did the stupid. We were staked out on an edge where tarpon would migrate through based on tide. I had the pole at too sharp of an angle. We were both on the bow waiting for a shot or two at the poons. Both of us ignored how much the pole was bending. Then BOOM it snapped. I felt horrible. I offered to buy him a new one (** $$ OUCH **) but he said no. So I bought Stiffy’s feral kit and fixed it.

I have a 21’ Graphite Series. It’s been a solid push pole. But recently my social media feed has had some sectional push pole feeds and it got me thinking. Thought it would be an interesting topic for the community.

3 Likes

New here, trying to figure out this app.
Had a friend down to fish the forgotten coast.


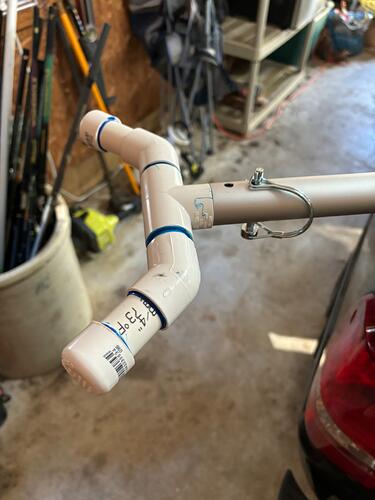
Didn’t have a push pole. Fashioned this with a telescopic pool pole and some pvc. Total cost under $70.

6 Likes

I chose the Carbonmarine G2LR 24’ for stiffness. It was being used on my Moccasin so Joe thought it the best choice. My Evo came with a Stiffy Guide 24’. I’m going to use the G2LR on the Evo and cut my Guide down for the Whip. I gave up poling the Moccasin.

3 Likes

Welcome!

1 Like

I’m pretty sure I have owned every brand of push pole over the last three-plus decades, all one piece. Two were lost, one bounced out underway and snapped and several others went with the boat sale or were upgraded and sold.

That said, I’m currently using a Stiffy Guide 3-piece sectional. I’ve owned Stiffy in the past, liked the products, but there wasn’t a dealer close by. Shipping costs from Texas were prohibitive for 22-24 feet, so I went with the sectional. The Skiffy guys mounted the foot and tip and I just had to epoxy the sections together. It has worked out great and I really can’t tell any discernible difference between it and the one-piece.

The Stiffy dealer in Tallahassee has a good policy. To reduce the shipping costs on one-piece poles, he orders in bulk and then each pole sold is also charged $50 for shipping to spread it out among buyers.

4 Likes

Be sure to rinse your aluminum pole with fresh water after every use. They will start to corrode with salt exposure.

1 Like

Carbon Marine G3LR 24’ here, bridged fork, nylon tip. Love it! I picked it up from his shop on the way to Flamingo. Bonus for doing that was I had a helm cover made at Seamore’s Canvas Shop which is in the same area as Joe’s shop.

Why? Because I’m 6’2" and fish for tarpon out of my Maverick HPXV 18 so sometimes this is in deeper water than the skinny waters.

1 Like

@PanaceaFlats welcome, and by your handle I’m guessing you’re a Wakulla guy. I’m on Crawfordville myself and fish mostly out of Bottoms.

To the question, TFO does still offer a push pole kit, or atleast it’s on their website, i just happened to see it the other day.

I’m gonna be odd man out here, but I use the Super Stick, 9’-18’. I know it’s not the lightest or most popular stick In the community, but I like the versatility of it. I fish solo almost exclusively so having the option of shortening it to 10-12’ when I pole from the bow, makes handling it much easier. Same if I need a second stake out pin to hold a position. Storage is much easier and cost is definitely much easier on the wallet.
Occasionally it needs a very minor adjustment to keep from slipping but that takes nothing more than a screwdriver. I’ve leaned in it way harder than I thought it could stand, but it took it.

1 Like

I bought an MHX sectional for my previous boat. The new boat came with a one piece Stiffy Hybrid. Just handling the two in the yard, I sold the Stiffy with the old boat. No regrets. Stiffy was twice the weight and twice the flex.

Mhx. Sectional great pole. Easy to put together only thing to look out for is it has directional grip so make sure you put it together correctly…all parts with the grip facing the same direction. Also you want to make sure the feet are set up so the grip is best set up for the foot you use most frequently. I had to carefully cut/grind mine apart to get everything the way it should be. Lost 6” of pole to fix my error.

1 Like

21’ Stiffy guide, because it came with the whipray. It does need to be refinished though, set outside for 14 plus years :face_with_raised_eyebrow:

1 Like

I like single piece poles and currently use a 24’ G3LR.

I feel a sectional pole is just extra weight in ferrules and failure points but could probably be proven wrong with data.

Stiffy hybrid is the best heavy boat push pole

Mudhole is the best value (performance/cost)

TFO is like cooked pasta

1 Like

23’ MHX Sectional from Mudhole. Longer, inexpensive pole that gets the job done for me. I pole flats from 1’ to 5’ and the longer pole comes in handy for deeper portions of the flats. Going on 5 years and no issues whatsoever.

1 Like

I’ve owned several Stiffy’s and several Carbon Marines. My last two poles were MHX 3 piece 23’ and I will probably only ever own those. Less than half the price with vet’s discount and it gets the job done. I like the texture of the Guide, but not at 3x the price.

1 Like

Stiffy Hybrid 24’. I used push poles in the 90s, so this feels light enough to me. Easy to find, cheap (relatively) to buy, worked for me.

1 Like

I’ve had both - sectionals at 20’ and and now a one piece at 24’.

The sectionals are good when put together correctly. I had no issue with them. That extra 4’ is nice though - it gives me another two or three hand lengths of push before having to pick up, which is results in more stealth.

1 Like

GL3 23’. Opted for the 23’ over the 24 because a 24 will either eat the back of my truck or stick out further then I want when trailering. I use this one mostly in Biscayne Bay for poling the flats.

Also own a 21 or 22 gl3’ that came with my Cayo that became a 19 or 20 or something like that (have not measured it) after I snapped it when it popped out of the spool style holder. Bought the repair kit and now I use it if I’m running the back country in ENP.

1 Like

I have 22ft Stiffy Guide series( friends with the owner of Stiffy) and a 23 ft MHX just because I wanted to try the less expensive sectional. I have to say I prefer the Guide but I think the MHX feels lighter. Never weighed them🤷‍♂️